1,安装mysql,centos6.5 和centos7 同样的安装配置方法
https://blog.wojc.cn/106.html
2,安装完开始配置:
主数据库master :192.168.21.103
从数据库slave :192.168.21.162
3,在主 master 上操作
修改master 配置文件/etc/my.cnf 下面3个参数为必须有的(如果按照上面文档安装这些参数默认是有的):
log-bin=mysql-bin
server-id = 1
binlog_format=mixed

binlog-ignore-db = mysql  #不同步的数据库,下同
binlog-ignore-db = performance_schema
binlog-ignore-db = information_schema
修改完配置文件重启数据库!
进入数据库创建用户并授权slave,该用户通过读取二进制日志,实现数据同步:
mysql> GRANT REPLICATION SLAVE ON *.* to 'myzhu'@'192.168.21.162' identified by '123456';
一般不用root用户,授权ip地址可以用通配符也可以任意,我这里指定为从库机器的ip地址。
查看当前数据库状态信息binlog日志文件名和偏移量(此处记住File名称和Position值,后面slave服务器配置时需要用到):
mysql> show master status;
+------------------+----------+--------------+---------------------------------------------+
| File             | Position | Binlog_Do_DB | Binlog_Ignore_DB                            |
+------------------+----------+--------------+---------------------------------------------+
| mysql-bin.000007 |      114 |              | mysql,performance_schema,information_schema |
+------------------+----------+--------------+---------------------------------------------+
1 row in set (0.00 sec)
修改完重启下mysql数据库,至此不再操作主数据库!
4,在从 slave 上操作:
修改slave 配置文件/etc/my.cnf(如果按照上面文档安装这些参数默认是有的) :
server-id = 2  #此数值一定要和主的不同,我这里设置为2,也可以用ip最后一段
binlog-ignore-db = mysql  #不同步的数据库,下同
binlog-ignore-db = performance_schema
binlog-ignore-db = information_schema
修改完配置文件重启数据库!
配置从库连接主库:
#这里的 mysql-bin.000007 对应主库查询状态信息中的
#这里的 114              对应主库查询状态信息中的
mysql> CHANGE MASTER TO MASTER_HOST='192.168.21.103',MASTER_USER='myzhu',MASTER_PASSWORD='123456',MASTER_LOG_FILE='mysql-bin.000007',MASTER_LOG_POS=114;
启动从库同步:
mysql> start slave;
查看状态:
mysql> CHANGE MASTER TO MASTER_HOST='192.168.21.103',MASTER_USER='myzhu',MASTER_PASSWORD='123456',MASTER_LOG_FILE='mysql-bin.000007',MASTER_LOG_POS=114;
Query OK, 0 rows affected, 2 warnings (0.03 sec)

mysql> start slave;
Query OK, 0 rows affected (0.01 sec)

mysql> show slave status\G
*************************** 1. row ***************************
               Slave_IO_State: Waiting for master to send event
                  Master_Host: 192.168.21.103
                  Master_User: myzhu
                  Master_Port: 3306
                Connect_Retry: 60
              Master_Log_File: mysql-bin.000007
          Read_Master_Log_Pos: 114
               Relay_Log_File: localhost-relay-bin.000002
                Relay_Log_Pos: 267
        Relay_Master_Log_File: mysql-bin.000007
             Slave_IO_Running: Yes
            Slave_SQL_Running: Yes
              Replicate_Do_DB:
          Replicate_Ignore_DB:
           Replicate_Do_Table:
       Replicate_Ignore_Table:
      Replicate_Wild_Do_Table:
  Replicate_Wild_Ignore_Table:
                   Last_Errno: 0
                   Last_Error:
                 Skip_Counter: 0
          Exec_Master_Log_Pos: 114
              Relay_Log_Space: 434
              Until_Condition: None
               Until_Log_File:
                Until_Log_Pos: 0
           Master_SSL_Allowed: No
           Master_SSL_CA_File:
           Master_SSL_CA_Path:
              Master_SSL_Cert:
            Master_SSL_Cipher:
               Master_SSL_Key:
        Seconds_Behind_Master: 0
Master_SSL_Verify_Server_Cert: No
                Last_IO_Errno: 0
                Last_IO_Error:
               Last_SQL_Errno: 0
               Last_SQL_Error:
  Replicate_Ignore_Server_Ids:
             Master_Server_Id: 1
                  Master_UUID: f63e4be8-08ab-11e7-90bd-000c29bae23f
             Master_Info_File: /usr/local/mysql/data/master.info
                    SQL_Delay: 0
          SQL_Remaining_Delay: NULL
      Slave_SQL_Running_State: Slave has read all relay log; waiting for the slave I/O thread to update it
           Master_Retry_Count: 86400
                  Master_Bind:
      Last_IO_Error_Timestamp:
     Last_SQL_Error_Timestamp:
               Master_SSL_Crl:
           Master_SSL_Crlpath:
1 row in set (0.00 sec)
这两个状态一定都要是Yes,有一个是No 都是错误的!
Slave_IO_Running: Yes
Slave_SQL_Running: Yes
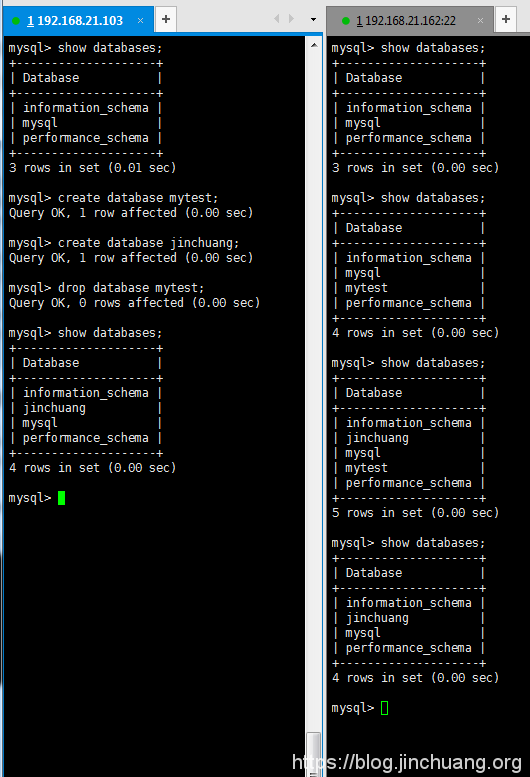
5,接下来在主库master 创建和删除测试从库是否同步有问题:


